Sunday, November 29, 2015

The Results

So last week I laid down the gauntlet that I was going to use this down week from work to rework Pain Logger to use the Realm database engine instead of CoreData and sync it all with CloudKit. Here are the results:

Monday

So I started looking at the existing code and I realized I needed to reorganize it a bit. In order to make it easy to manage and maintain, my idea was to create a single DataService class and have all persistence requests go through that.

The original Pain Logger code had a fairly standard CoreData stack being stood up in the AppDelegate (capturing the MOC on the way) and then it used helper classes for each of the managed objects. These helper classes isolated persistence logic away from the managed object instances and out of the AppDelegate. There was one managed object type per table and therefore one helper class per object type.

So my first order of business was to move all the helper methods and the CoreData stack initialization to the new DataService class.

I actually decided to concentrate on one UIViewController (VC) at a time, and move just the persistence methods it used. That way I could see progress.

After moving the methods for my first VC, I tested and found everything was still working.

The first VC just shows a list of the top level objects in my database so it wasn’t that hard.

Now I needed to install Realm. My idea was when the DataService stood up it would not only configure it’s existing CoreData stack, but it would also stand up the Realm database in order to migrate all the records.

I installed Realm for Swift 2.1 per the documentation Realm provides when you download their code.

I also installed the other tools, such as the Realm plugin for XCode and the Mac app Realm browser.

The only catch was after adding the “Run Script” (per Realm’s documentation) and trying a build, the build failed because the “strip-frameworks.sh” script didn’t have execute permission. So I opened up terminal and added execute permission to that file and all was good. Note: after you make this permission change, you next need to do a project clean so you won’t be using a cached version of the script.

My next hurdle was I needed to create Realm representations of the managed objects. So for example my Category class (which extends NSManagedObject) got a sister class called PLCategory (which extends Object).

Here was my first dilemma (and opportunity for improvement). CoreData doesn’t support enums, so all the enums in my data objects had to be converted back and forth between NSNumber objects. In Realm the answer to this is to overide the variable’s getter/setters. For example in the CoreData model assume you have this variable:

@NSManaged var line_color:NSNumber

I have an enum for this variable called LineColorType, so in the Realm object this becomes:

private dynamic var line_color = LineColorType.LINE_COLOR_GREEN.rawValue
var lineColor:LineColorType {
    get {
        return LineColorType(rawValue:line_color)!
    }
    set {
        line_color = newValue.rawValue
    }
}

The big change here is the application code will use the more standard camel case variables while Realm will store the raw value variables in it’s database.

My guess is I probably could have done this same thing with CoreData, but I’m not on that right now.

Delimma: There is a lot of boiler plate code left around to support CoreData and now adding Realm, although the new code is tighter, it is still MORE code. When do I get rid of the boiler plate code? I think the best approach is to finish all the changes and submit an update to the app store then after about 6 months (once I feel confident all existing users have upgraded and opened the app so the database has been migrated) I’ll remove the old CoreData code.

Day 1 Progress:
At the end of the day I have the model migrating to Realm. A good start I think. Tomorrow, I’ll start on the CRUD operations.

I ran into two issues for the day. First, how do I browse my Realm database. This StackOverflow link shows how to do that.
Second, my computed fields showed up in the database as well. It turned out I needed to mark them as non-persistent.

Delimma: Do I need a unique id on my objects? I decided I did, but I couldn’t just use an int because Realm currently doesn’t have an autoincrementing id scheme (it supposedly is coming). Anyway I choose to use NSUUID.UUIDString in the interum. We’ll see how that goes.

Tuesday

For today, my goal was to flesh out the persistence layer. My idea was to, along with the default Realm, set up a Realm for caching data when the user is offline, and a Realm to simulate the eventual online CloudKit support.

For testing purposes I plan to have a flag that I can turn on and off to simulate the app being in offline mode. Eventually this will be replaced by real code to check the availability.

As usually happens for plans like these, I ran into a snag.

I needed to add some test data, so I started using the app and realized there were parts of the UI that after the conversion to Swift didn’t functionally work, although they did compile.

It turns out I had used a automated conversion program to convert some of the original Objective-C code so that I didn’t have to type as much and it didn’t convert it as well as I would have liked.

So I spent most of the day fixing those issues.

By the end of the day I was able to add records as before, with them getting saved both to the CoreData database and the default Realm.

Wednesday

Today was a short day due to the preparations for the Thanksgiving holiday. My plan was to regroup and get more of the things I had planned to accomplish the previous day working.

One of the nagging issues I had was I feel the need to keep the old CoreData code active, while also adding the new Realm support. That way my existing ViewControllers can consume the old model objects until I am ready to make the transition to the new model objects. But this has turned out to be more problematic than I had hoped.

Another issue is parent-child relationships. In the existing code, when adding a new child, the child object would first be added to the database and then some updates were done on some computed values on the parent object and it would be saved.

This caused me to have multiple completion handlers that “chained” the updates. With Realm I can do all of that in one write transaction which is very helpful, but untangling the mess I created in the old code will take a bit of time.

Side note: Argghh! I’ve been “working” for about 3 hours and only got about 30 minutes of work in. I need to fill all these people up with tryptophan and me with caffeine. Unfortunately that won’t happen till tomorrow.

One thing that I don’t understand right now is should I cache the Realm’s I create? Are they expensive to stand up. Reading the documentation it feels like they are not. So to be thread safe right now I will make the Realm accessors in my DataService be computed attributes like this:

private var defaultRealm:Realm {
    get {
       return try! Realm()
    }
}

Is this a bad idea? I’m not sure.

Thursday - Thanksgiving

Not sure I will get much done today. Too much food, family and football!!

Friday - Saturday - Sunday

Well as expected, too much family time and not enough development time. I’ll have to continue this effort next week.

I didn’t quite make the goal I had originally started out to do, although now, I am much more comfortable with using Realm and I think this will be a very fruitful effort. I’ll make another post in a couple weeks to update my progress.

Till next time,

Sunday, November 22, 2015

The Plan

Well, I made it through last week’s annual run of Competition Manager, pretty much unscathed. The software worked flawlessly, however, as usual there were last minute requests for changes.

Competition Manager is a little different than other products, I have worked on, as (after the registration period closes out) it has to be rock solid for a frantic 24 hour period and then it is done until next year.

I always get requests for changes during that 24 hour period. It has always been my worst fear that a change request comes in that HAS to be implemented in the current run.

So far that has never happened and although I got another change request this year, we were able to work around the concern and put it off till next year’s competition. Whew!! another crisis averted.

So with that behind me for another year, I need to turn back to my mobile app, Pain Logger.

I completed the conversion to Swift about 2 weeks ago. Now it’s time to upgrade it.

Fortunately for me, the holidays provide time away from my day job and allow me to (while of course spending time with family and resting up) look closer at some of my side projects.

I read somewhere that to really be productive, you should state what you intend to do and your goal date so others can keep you accountable. So that is REAL goal of this post.

My Goal
My goal this week is to rewrite Pain Logger’s persistence layer to use the Realm database engine instead of Core Data. I intend to write it in such a way that an existing install will automatically migrate the existing CoreData database to Realm when the application launches and then on subsequent runs it will use the Realm database and not CoreData.

Once that is done I intend to stand up CloudKit support for the app. I intend to use Realm as the offline cache for the CloudKit database supporting the app.

So that is my plan, I intend to blog about my progress (which I hope to be complete) next week.

There, I now have placed the proverbial stake in the ground.

Now, why did I make the decision to go with Realm instead of using CoreData?

First, I wanted to learn something new.

Second, while CoreData works, I’ve always been put off by all the boiler plate code that needs to be done to stand a stack up, along with all the other moving parts you have to keep in mind as you are working with it. It has always felt so “2000s”ish to me. I want something more modern.

Realm seems to have that modern feel that I am looking for.

Having said all of that, I do, however, reserve the right to change my mind if this just turns out to be a really bad idea after getting into this.

So there you have it, until next time, here’s hoping for progress.

Sunday, November 8, 2015

Legacy Prawns

Ok, so I am coming to the close of my annual deployment of my Competition Manager application.

Right now registration is closed and the actual competition will happen this Friday.

In a way this is a bitter sweet time. In one way I am excited to see the culmination of my effort, but in another way it is a distraction to the other projects I am working on.

The project is a legacy app using Ruby on Rails version 3.2. I know I should update it to the latest version of Rails, but since it is not a paying project it’s hard to justify the effort.

At any rate, when the actual competition occurs this Friday, everything must work seemlessly, as the competition occurs over about 20 hours and all the scores and results must be collected, entered, calculated and reported on during that time.

This is the critical time for Competition Manager as there really is no time to fix any bugs if they were to arise.

So I was doing my due dilligence by testing the scoring and reporting modules of the application yesterday and I realized there was an annoyance for the scorekeepers I should try to address.

In the past after the scores for an event were entered, the user would save the scores and print the report. This caused a pdf file to be downloaded and shown in the browser.

Unfortunately this takes the scorer out of the application and forces them to save the report manually for later printing or print it right then.

I figured a better approach would be to download the file to the scorer’s computer as a separate pdf file without taking them out of the screen they were on. That way they could deal with all the reports at one time.

To do this I needed to do two things:
1. Give each event report a separate file name
2. Download the report instead of opening it in a separate browser window.

So this takes me to the crux of this post. My overall intent of these posts is to document things I learned or had to research to solve so that I, for one, won’t have to re-learn the issue again and maybe also in the process it will help others.

Competition Manager uses an older gem called “prawn” for it’s pdf generation and “prawnto” to support templates.

Yes I know there are better solutions and even “prawn” has a new version but one week out from the actual competition I am not about to change out a major component of the product.

So I had to figure out how to fix this with the current legacy code.

The way this works is I have a route set up to serve the reports that once called retrieves the correct data for the report then uses prawnto to load the template and generate the pdf. The original controller method looked like this:

   def event_results
       @event = Event.find(params[:event_id])
   end

So what would happen is the client would call this method with the event id and then the template named “event_results.pdf.prawn” would be used to generate the pdf file that was then returned to the client.

I knew I needed to set the filename and stream the file back to the client, setting the correct headers, but how to do it was hard to find. Here is what I eventually found that would work:

  def event_results
      @event = Event.find(params[:event_id])
      prawnto :filename => @event.name + ".pdf", :inline => false, :template => "event_results.pdf.prawn"
  end

So now what happens is the filename is set to the name of the event (with a .pdf extension), it is marked as inline false so the document will be downloaded, and finally the template to generate is specified.

So in the end a one line change solved the problem. I tested it, deployed it and the product is ready for action this Friday.

Till next time.

Sunday, November 1, 2015

Solving From A Different Direction

As of late I have been a bit remiss in getting these blog posts out the door.

Part of the issue has been I didn’t have a good blog creation solution. I have tried standalone apps, the provided editor from my blog provider and I even tried using different plugins to get the results I wanted.

This week I was documenting the REST API for my new web project and I realized that what I was doing there might solve the problem I was having here.

The problem has been how to show code snippets. So far all the standalone blogging apps I have tried have failed in one way or the other when I tried to attach code. In fact it was so bad that in my last post I had to post screen shots of the code.

That’s not right, so I have been hampered by this problem for a while.

As I said, I was documenting the REST API for my new web project and I have been doing it in Markdown so that I could view it, nicely formatted, from the git repository. In it, I had to show an example of the REST call in CoffeeScript as well as show the resulting JSON that was returned.

Markdown has a very simple way of showing code snippets, but for me it wasn’t working exactly right. It was delineating the code, like I wanted, but it was showing it all on one line.

What I learned, after some investigation, is Markdown has different flavors. Oh the joy of the open source world we live in ;-/

Anyway once I figured out the syntax for the particular flavor of Markdown my git repository supported I was able to get the code snippet formatted properly. So my CoffeeScript code looked like this.

     $.ajax({
        url: "/goals",
        dataType: 'json',
        type: 'POST',
        data: {
          goal: ...
        },
        success: function(data) {
          ...
        },
        error: function(xhr, status, err) {
          ...
        }

With this working it got me to thinking. What if I just wrote Markdown documents, and then exported them to HTML and pasted them into my blog? Would it work?

So today’s post is mostly a proof of concept of that. I can already see one downside and that is I’ll need to keep the Markdown versions locally, if I want to make any edits. It pretty much makes the editor on the blogging site useless.

I found several online editors that can take Markdown and export the HTML. Another requirement was that this HTML file had to be a single file, otherwise it would be hard to cut and paste it into the blog application.

After trying JavaScript, Swift and Ruby code I was pretty confident this could work. However, I also needed to show ReactJS code as well.

This has been the code that has presented the most challenge to the various solutions I have tried. The reason I think (I use JSX syntax) is the code starts out as JavaScript but then in the “render:” method turns into XML/HTML.

All this works because of the “JSX” compiler.

However, I have not found a standalone app that has handled this well. Admittedly I do need to go back and see what support the standalone apps have for Markdown, since I now think that is right format to use. At any rate, here is a simple JSX file:

var Page = React.createClass({
  getInitialState: function() {
    return {goals: []};
  },

  componentDidMount: function() {
  },

  render: function() {
    return (
        <div className="col-md-10 main defaultheight">Page
        </div>
    );
  }
});

I was pleasantly surprised how well this worked.

There is another advantage in using this scheme and that is any documentation I write for my iOS projects can also be done in Markdown (well a flavor of it).

So in the end the fix to a problem I was having for a different issue (that of documenting the REST API) may also solve the problem I have with including code snippets in blog posts. Anytime I can have one solution that solves two issues, I call that a win!

Till next time.

Sunday, October 18, 2015

Reacting with Rails

This week I returned to my new web application.  I decided a few weeks ago, the best solution for this app would be to use ReactJS for the client.

The reasons for this decision were:

1. I had an interest to learn ReactJS
2. I felt I only needed a client side solution and not a full MVC stack. 

Unfortunately, I don't know ReactJS, but how hard could it be, right?  

To be honest, I found it fairly natural.  I had a few basic questions that I thought if I could answer I would be on my way.

  • How to create a ReactJS component?
  • How to connect ReactJS components into an application?
  • How to serve a ReactJS application from RoR?
  • How to load data from the server and update a ReactJS component's state with that data?
  • How to update a ReactJS component's state with data?

Before I could start answering these questions I had to decide whether I would use the Rails asset pipeline to build my ReactJS application or should I build the app using a separate build "eco-system" inside or outside my Rails application. 

I had read suggestions that I should keep my client build system separate from my server build system since npm packages would be more up to date than their counterpart  Ruby gems, and some JS libraries I might want to use wouldn't even be implemented as Ruby gems.   

I contemplated this for a while, but in the end I decided that even though it seems cleaner to keep the build systems separate, I really don't know NodeJS well enough to develop a production level application nor do I have the time right now to get to that level of expertise.  I do need to delve into that arena, in the future, but not right now.

So I decided I would see how far I could go with just leaning on the standard RoR tool chain.

This turns out to be a MAJOR decision.  I did find a few links on making this decision.  One of the best discussions of the different alternatives, I found, was a blog post by Blaine Hatab (link here).

Using Blaine's classification I chose what he calls method 1.  In his post, he turned this method down as he wanted to do server side rendering.  My goal was to avoid server side rendering by serving up the client in one call and then have the client make AJAX calls to the RoR application for it's data.   

With that decision made, I was ready to tackle my list of questions to get going.

How to create a component?

There are plenty of tutorials on how to do this so I won't go into details about this.  The big decision I had to make for this step was should I use JSX or JavaScript.  

If I chose JavaScript then I had the choice of straight JavaScript or CoffeeScript (since it is baked into RoR).The tutorials I found were a little bit of both.

In the end I chose to use JSX for my ReactJS components and CoffeeScript for any other code.  

To make this work all I had to include was the 'react-rails' gem.

After the asset pipeline is run by RoR you end up with straight javascript files anyway, so it felt natural to use the JSX syntax for ReactJS components, since it looks a lot like HTML with javascript mixed in.  

So on to the next question.

How to connect React components into an application?

This one turned out to be real easy.  Since I was going for a SPA type application I needed to create the root component of the application and serve it via a view.

My top-level component looks like this (Note: I have had a wail of a time showing code in my blogging application, so for now I will just show images so I can get this post out, if anyone knows of a good client that actually works with blogger I'd appreciate it):


In the end I created a router via the 'react-router' gem but for this post I won't go into that.  I'll talk about that in a later post.

From here all the other components of the application just hang off of this one.  On to the next hurdle:

How to serve a ReactJS application from RoR?

This turned out to be easy as well.  By using 'react-rails' all I had to do was connect up the main application from above.  'react-rails' comes with an easy way to do this so my index.html.erb looks like this:


Yep, it's a one liner.  I also removed all the extra stuff from my layout as the ReactJS component was going to supply it all so my layout ended up looking like this:


Again, extremely simple.  On to the final challenge:

How to load data from the server and update a component's state with that data?

This is where things got a little complicated.  ReactJS components have 'state' and the idea is that they bind to this state in order to always keep it up to date.  Additionally, a component can pass this state to child components which is then available to child components in their 'props' array.  

I found several tutorials that used the ability to pass in properties in what I considered a bad way.  For example they would pass in callback methods so that when an action was taken in the child component the parent's callback function (which was passed as a property to the child) would get called.

I didn't like this idea as it seemed to couple the components together very tightly.  What if I create a panel component to show an object and want to use it somewhere else? Will I remember to wire everything up appropriately?  Knowing me, probably not.  

This led to a design pattern that has been espoused for ReactJS applications called Flux.  To be honest when I first read about it, my first reaction was "why did anyone need to come up with a new pattern just to replace MVC?"  

I definitely had an aversion of learning this new way of thinking.

I tried to go down the route of passing in properties and coupling with callbacks, as outlined above, but as I started to segment my components into what I felt was logical components it got unwieldy.

For example, in my application's main view I have a header component and two list components.  In the first list component it shows a series of panels, one for each object in my application.  In the second list component it shows children of the currently selected panel in the first list. 

The main application was the only component that knew about both lists.  In order to wire up the first list so that the second list would get updated when the selected panel in the first list changed, I would need to pass in a callback method to the first list that was owned by the parent component and then the parent component would communicate to the second list what to do.  

It got even more complicated if actions in the second list affected the state of the selected panel in the first list.  What I needed was an event system.

This is where the Flux design pattern came in.

So, reluctantly I started to learn about Flux.  

The idea with Flux is the components are not dependent on each other.  Instead they communicate by firing and reacting to events.  Since Flux is a design pattern, there really isn't any code to install, so the implementation is left up to the developer.  

I'm going to talk about how I implemented it, I'm sure others will have different opinions on how to implement it.  Probably my way isn't even correct, but it is working for my needs so I am going with it.

Essentially the way I have it implemented is as follows:

- All state is stored in 'Store' objects.  These are essentially singleton objects. Right now I have a SessionStore for session type objects (user's profile) and an AppStore for everything else.  So if I load something from the server, say the list of objects to show in my first list component above, they are stored in the AppStore object, NOT in the list component's state object.  

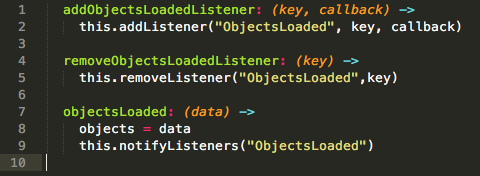
- When the list component mounts, it registers as a listener to the AppStore component. Specifically it registers for it's interest for the objects being loaded.  An example would be:


Notice this is CoffeeScript.  Like I said above, any JS class that isn't a ReactJS component I wrote in CoffeeScript for the succinctness and the safety that CoffeeScript affords.  

A couple of things about this method.  When a component registers as a listener it passes a key that represents itself (I use the component's display name) that way it can deregister itself when it unloads.  
Also it passes in a callback method.  This callback method is the magic.  So the idea is when the event occurs the callback is called and the component then takes the appropriate action based on the event that occurred.

- If an action occurs in the component it calls a method on a ActionCreator class specifically for that event which is responsible for collecting any parameters about the action, packaging it up as an action and sending that action to a Dispatcher.

- The Dispatcher class acts as, well, a dispatcher and determines if the action is a server action, in which case the action is passed to a WebAPIUtils class which communicates with the server tier or a view action in which case it dispatches the action to the appropriate 'Store' object which in turn fires the appropriate event for the action that occurred. 

At this point the circle is complete.

I realize this was a little vague so I'll finish this post with code from the example above. One important note about this before I start into it.  This is not exactly how the code is implemented.  I have removed calls to helper methods, usages of constants, and I sanitized the code to be more generic than the actual implementation.

First here is my list component.  It's job is to show a list of objects retrieved from the server:


Note in the 'getInitialState' method the loading of the objects from the store class.  Initially it is empty.  Also note in the 'componentDidMount' method how the component attaches itself as a listener to the AppStore class.  It's also important to look at the callback method that is registered when the component is added to the AppStore's listeners.  This callback sets the state of the ObjectPanelList which will cause the render method to be rerun which in turn refreshes the view with the latest state.

Next let's look at the pertinent methods in the AppStore class.


As I mentioned earlier, this is a CoffeeScript file.  Notice how the add/remove methods hide the event names from the caller and register/deregister the listener in an internal hash of listeners.

The important method is the 'objectsLoaded' method which gets called when the objects are loaded from the server.

Now when the application is loaded an event is fired to load up the objects.  This is done on the parent component of ObjectPanelList.  Here are the pertinent methods of that component:


Essentially when the component is mounted it calls an internal method to tell the ActionCreator to load the objects.  One cool side effect is, it doesn't really matter whether this action completes before or after the ObjectPanelList renders.  If it happens before the ObjectPanelList gets the correct list when it renders from the AppStore, if it happens after then the callback method the ObjectPanelList registered in the AppStore listeners is called and it picks up the right objects then.

The pertinent method of the ActionCreator class is as follows:


This is a class level method that packages up the action and calls the appropriate Dispatcher method.  Here is one point I am not sure about.  The ActionCreator (at least the way I have it implemented now) knows that this must be a server action.  Another approach might be to have a handleAction method on the Dispatcher that encapsulates this knowledge.  

The pertinent Dispatcher methods are as follows:


Again we find class level methods.  The '@handleServerAction' just repackages the original action.  I'm not sure that is the best approach but in the tutorial I was (loosely) following that was how I understood it to be implemented.  Seems like an unneeded level of indirection.

Finally, here is the method on the WebAPIUtils class:


This is the final piece of the puzzle.  An AJAX call is made to the server and when the response is received (hopefully successfully) the AppStore's 'objectsLoaded' method is called which in turn calls the attached listeners.  One concern I have here is, should I have this call an ActionCreator method to put the action into the system.  It would seem that might be the case as it would match the architecture when making the remote call.  But at this point it seemed like it was unneeded.  I'l need to monitor the code to see if that is a refactoring step I need to make.

Well there you have it.  A complete round trip from the JSX components to the server and back.  This avoids almost all coupling of components together and sets up an event system that can be used for both remote calls as well as inter app calls.  

For example in another case I need to update a dependent list when an object in the first list is selected.  This uses the same pattern, but with a different event type and there is no remote server call.  

As I continue to scale out the features in this new app, I find this pattern to be holding up quite well, a and more importantly the code feels natural and well separated.

That's it for this week.  

Sunday, October 4, 2015

Rinse and Repeat

This week starts what I call my "silly" season.  Except this year it is more crazy than normal.  

Each year I deploy my Competition Manager product to support the state wide North Carolina Nazarene Youth International Teen Talent Festival. 

Besides doing this, I also continue working on my existing apps, and this year I also have a second web app I am working on (more on that in a later post).

Competition Manager uses Ruby on Rails for the server side, JQuery UI for the client side and MySQL for the database layer. It is used to manage the registration, scoring, accounting, and reporting for the event.  Pretty much any aspect that could be automated it does.

Fortunately, each year (we are going on 6 years now) I learn steps to streamline the process.  This year those gains have helped out as the organizers want the system up and running two weeks earlier than normal.  I just found this out last week, yikes!!

I have gotten the steps down to these five:

  1. Deploy the production server with last year's image
  2. Configure my development machine with last year' code and data
  3. Make and test any requested changes on my development machine
  4. Deploy changes to the production server and do a sanity test
  5. Hand control to event organizers and provide any necessary training
 I got through the first step with ease.  Probably the easiest I have ever done.  So I figured the next steps would go as smoothly. 

I was wrong.

The night before, I had upgraded my dev machine to the latest version of OSX, El Capitan.  I had heard about it adding stricter security settings but I figured that was for the normal user, Apple wouldn't do anything to hinder a developer, right?

Over my years I have used Windows, Linux and OSX systems for development and I have come to the (very opinionated) opinion that OSX is the best operating system for my development needs.  

It gives me the robustness and configurability of Unix under the hood should I need it while also giving me the 'GUI-ness' of windows without all the hacks and quirky setups the Linux windowing environments have.

I absolutely hate administering a computer when I should be developing. 

Don't get me wrong, over time each OS has advanced in features and usability.  But for me, as long as I can afford it, I will stay with OSX for my development needs.

At any rate, I figured "what could go wrong?", I'll just install El Cap, and start off fresh and new with standing up this year's version of Competition Manager.

Well, it turns out the security settings that El Cap comes with don't allow you to change some files, like those in /usr/lib.  

The problem I had was the mysql2 rails gem was looking for a mysql dynamic library in /usr/lib but it was in /usr/local.  

The traditional fix for this is to setup a symlink from /usr/local to /usr/lib.  No problem I thought, I'll just do that. 

ln -s /usr/local/mysql/lib/libmysqlclient.18.dylib /usr/lib/libmysqlclient.18.dylib
Operation Not Permitted
What! I can't do something this basic! But I have sudo privileges!  
The first Google entries I found dealt with this problem back when El Cap was in beta.  Their solution was to turn off the security settings, but there was also a caveat mentioned that this ability would not be allowed in the gold release.  
Arggh, I found instructions on how to reboot the machine and do this in recovery mode. But it didn't look like something I really wanted to do. Not to mention I didn't want to waste the time.  I wanted to program!! 
Right before I was about to reboot into recovery mode I decided to search one more time and I found a more recent solution saying that I should just reinstall MySQL using homebrew.
So rather than take the time to change my security settings and go through all that rigamarole I decided to try the second suggestion first.  I fully expected it not to work.  But wouldn't you know, after about 15 minutes, it was loaded and I was back in business.
Whew!, I dodged a bullet there.  Anyway, from there it was all down hill. By the end of the day on Saturday I had plowed through steps 1 through 3 and I am just about ready to finish steps 4 and 5 up and release it for production.
A good weekend's work!!  Till next time.  


Wednesday, September 30, 2015

UI Testing

This week I spent time looking at UI Testing using iOS 9 and XCode 7.

I'm not going to go through the details but I did find these two links to be good enough to get going.


The first one is a little light on the details but I found it useful in giving simple steps for adding UI testing to an existing app.

The second one, I thought, did a better job of showing how to actually assert test results once you got everything up and going.

So what was my intent with this and why should I take the time to add this to my current project(s)?

Well to be honest, it didn't take more than about 30 minutes to read the articles and get going.  I did do a test project prior to adding to my existing production, or to be production, apps.

For the conversion to Swift of Pain Logger I see this as an invaluable tool to verify that once I switch a view controller over it still works as it did before.

For my "in work" app I see adding this functionality now as a way of validating and protecting from regressions in the future.

In short, setting it all up, and running the first tests was fairly simple, and I think will be a valuable tool in the tool chest.

I spent most of my time diving into ReactJS this week.  There is a lot to learn here and I'm not convinced it is the right tool for the web app I am building.  Time will tell.  One thing I find hard is finding good training on the subject.  If anyone knows of good sources for this, particularly when using with Ruby on Rails, please pass them along.

There are a few articles, and I have probably read them all, but like most things, especially in the UI world, lots of folks have their opinion on how it should be done, with each one having different tradeoffs.  More investigation is needed.

Till next week.